 |
| Master Bathroom COMPLETE |
 |
| Old Workbench |
 |
| Wood Top |
 |
| Menards Sink |
 |
| Bathroom BEFORE |
 |
| Vanity with old faucet (temporarily) |
 |
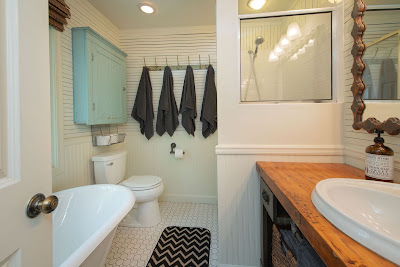
| Bathroom AFTER |
As seen in
Parts I &
II, this master bath is almost complete! Now the search is on for the perfect "vanity". Anyone who knows me knows that I am not about to go shop for a typical bathroom vanity in a box store. My search took me straight to my backroom home staging stash at
KalamazooKitty! I had picked up an old workbench many years ago and never put it to good use (other than a surface to pile stuff on). The top of the workbench was covered in a thick cardboard, so I never knew how cool the top was until I pulled the cardboard off. Oh! My! Goodness! The top was an extremely thick, beautiful piece of wood filled with holes, burn marks and "character." I was thrilled! After a quick sanding & trim on each end, we snuggled it into place between the wall and shower. It fit so perfectly and was exactly what this bathroom needed. Using a
jigsaw, I cut a hole for the sink. After carefully cleaning up all the sawdust, I applied 3 coats of
marine-grade clear topcoat with a brush, lightly sanding in between coats (don't forget to coat the edges of the counter, the underside and inside the sink cutout). I chose a small sink (from
Menards) because I am a BIG fan of a large counter with a small sink, not the other way around. A little adhesive to hold it in place and clear silicone around the edge of the sink, and it was time for a faucet. I ordered this black faucet from
Home Depot and loved it so much that I put it in two other bathrooms in my home. Not only does it look great, the water flow and temperature are just right... A+! Because my new vanity was originally a workbench, it did not have any storage. After adding a couple custom-made drawers (thanks, Bumpa!), a pipe towel bar and baskets under the sink, it was finished! I gave the new drawers a quick coat of
chalk paint and distressed them to match the well-worn workbench. Be sure to pay attention to detail when using a vanity that is open underneath. Plan ahead to use
chrome for your plumbing so that it looks as great as the rest of the bathroom. Coming up next....a few finishing touches in Part IV!
This is from Kalamazoo...to you!


Comments
Post a Comment