Now that the floor is complete with "new" grout within the original tile, it is time to focus on the walls. If you missed Part I, click
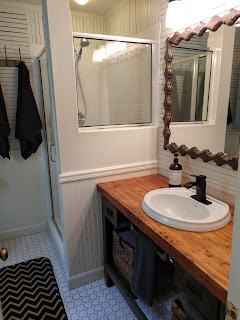
here to get caught up! This master bath was given a chair rail with beadboard below and textured drywall on the rest of the walls by the previous owners (I assume). So to update this look without removing the tub, I added lath to the upper half of each wall. Before you rush into this project and start slapping up lath, check out my tips and step by step list to insure your bath remains mold and mildew free:
Step 1: Go to your local hardware/paint store and choose a mold and mildew resistant paint that is tintable, unless you want bright white walls. For this bathroom, I chose Nacre in satin, a Sherwin Williams color. This paint was used on the lath, beadboard, trim and ceiling. You will need a gallon of "black" paint, as well as the Nacre, both in mold and mildew resistant paint.
Step 2: Paint the drywall with black, or as close to black as the paint can be mixed (achieving a true black is not necessary). One coat of black is all you need since this color just peeks through the cracks. Mark the studs on your walls so you know where to nail into. Paint the trim, ceiling, and beadboard in Nacre. If you don't have beadboard, take the lath all the way down to the baseboard...it will be awesome!
Step 3: Find straight lath strips or lattice at a lumberyard or home improvement store. This is time-consuming, but well worth it. I chose lengths to span an entire wall so I didn't have cuts in the middle. This gives you a much cleaner, professional look in the end. If you can't get the length you need, you can change the direction of the lath from horizontal to vertical, like I did above the window, door and shower. It adds interest and makes installation easier!
Step 4: Lightly sand and paint every piece of lath, in Nacre, on all 4 sides...ugh! This is the "hardest" part of the remodel due to the amount of time it takes. This will safeguard your walls from mold and mildew, so it is worth every minute.
Step 5: Grab a nickel or two! This 5 cent "tool" will act as a spacer between boards to keep your lath straight and consistent. Using a nailgun, attach your first piece of lath at the chair rail or baseboard, wherever you are beginning the treatment. Be sure to follow your stud marks so the boards are secure to the wall. Place a nickel on top of your first board and install the next board tight to the nickel. Be sure your chair rail is level before you begin and level your lath as you go.
Step 6: Caulk the corners where the boards come together and fill nail holes.
That's it! Your new wall treatment will be unique, interesting and loaded with texture. I love how the black shows through the cracks and adds dimension, so don't skip that step! Watch for Part III Master Bath...Workbench Vanity!
This is from Kalamazoo...to you!


Comments
Post a Comment